Having recently made the switch to a self hosted site from a wordpress free site I wish I had this information to hand before I did it! If you are thinking of switching over then I would encourage you to do it sooner rather than later – you might loose some followers but at least the new ones will be following you to the right place!
I’d also recommend that you bookmark this article and read it thoroughly as you make the changes. It’s the best I’ve found to date! x
First off I have to thank those of you who have made the effort to find my new blog and subscribe there. I think we’ve got the niggles and problems sorted out and, finally, I’ve managed to repoint our domain towards it so you can go straight there using www.bigredbarn.co.uk (go on, try it).
For those of you who see my updates in your inbox, I’m afraid that won’t happen unless you re-subscribe on the new site 😦 but just pop over there and stick your email in the box so you don’t miss a thing!
Now we’ve everything (just about) sorted out, we’ll be able to concentrate on getting back to our regular posts and bringing you loads more great articles!
Thank you for your support and patience while we’ve been moving house – hope to see you at the new place real soon!
I’m about to move from a free wordpress site to a self hosted one and I’m not sure what’s going to happen! Eventually I hope you will find me at http://www.bigredbarn.co.uk but thinks might go a little kooky for a day or 2 while I get all my ducks in order.
Please keep following me as I really appreciate every ‘Like’ and every comment and I squeal like a kid at Christmas every time I get a new follower!
I’m hoping to get a redirect on here but it will be miraculous if it all goes without a hitch, so bare with me.
Thank you all for the fun so far an I’ll see you in our new home soon!
After the success of last weeks post showcasing 5 of the best blog posts that I’d stumbled on I thought I would do it again this week! I’m not sure if this should be a weekly thing or just monthly… I’ll keep you posted!
This first item actually comes from a stationery/scrap-booking blog (who’d of thunk it, eh?). Technically it is a furniture makeover, being drawers and all, and I thought that it was the biggest shocker between the ‘before’ and the ‘after’. Afraid there’s no tutorial but pop over to Between The Sheets for more detailed photographs.
Source: Between The Sheets
The next piece isn’t a makeover but has full plans on how to make a great rustic cupboard. Shanty 2 Chic use theirs to store a coffee machine but it would be a great place to tidy away all those craft bits, paperwork or just about anything! I also loved the colour she used on the final piece.
Source: Shanty 2 Chic
This next piece is from Rustic Whites but is anything but white! I absolutely adore the colour used – it reminds me of the Antibes Green I used under the little spice rack – and makes me want to go bolder with colour in the very near future!
Source: Rustic Whites
Now usually I’m not a big fan of stenciling, not even when you design it yourself, but when it’s done as well as this find over on Art is Beauty, then I give it a big ‘Thumbs Up’!
Source: Art is Beauty
And finally, I thought this Ikea hack from Girl in the Garage was fantastic.. partly because I’m working on the same set of drawers but with a completely different finish but mostly because it’s so much more practical than using vintage suitcases and much, much easier to find!
Source: Girl in The Garage
Well, that’s it for this week’s Five of The Best, I hope I managed to find something you haven’t seen before? Shall I keep it going every Sunday night or do you think once a month is enough?
Watch out for this week’s posts on distressing using Vaseline, Mark’s Makeover, and my very own Ikea hack.
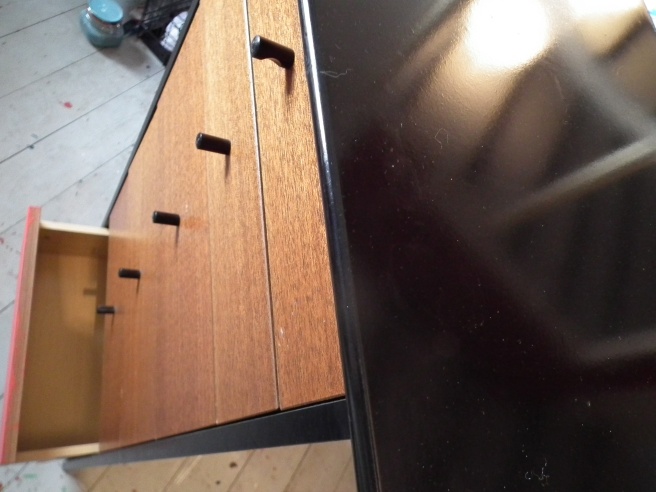
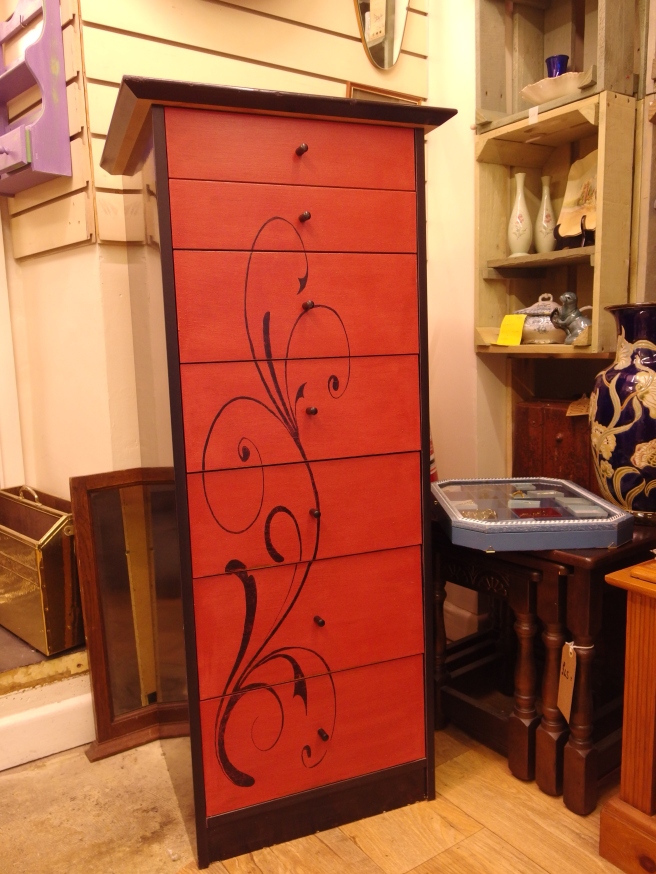
I was offered these drawers by a trader friend of mine who needed the space in her shop. She wasn’t charging me a fortune and there was something about the shape and styling in them that appealed to me. They were well made but modern and I knew straight away what I was going to do with them. Mark, on the other hand, hated them!
Great shape but very 1984!
I started off with 2 coats of red chalk paint (my own mix) and then turned the laptop on and fired up Pinterest. I needed a free swirl that I could use to decorate the front and, sure enough, Pinterest delivered!
Then I turned to Block Posters to transform it into a PDF and transferred it onto the drawers (I will be writing a tutorial on the method I use in the near future). It wasn’t quite as bold as I wanted so I went over it with a Sharpie and then sanded back just a little so it wasn’t too sharp.
A quick coat of wax varnish and they were ready to stick online… only now Mark likes them and wants them down the shop!
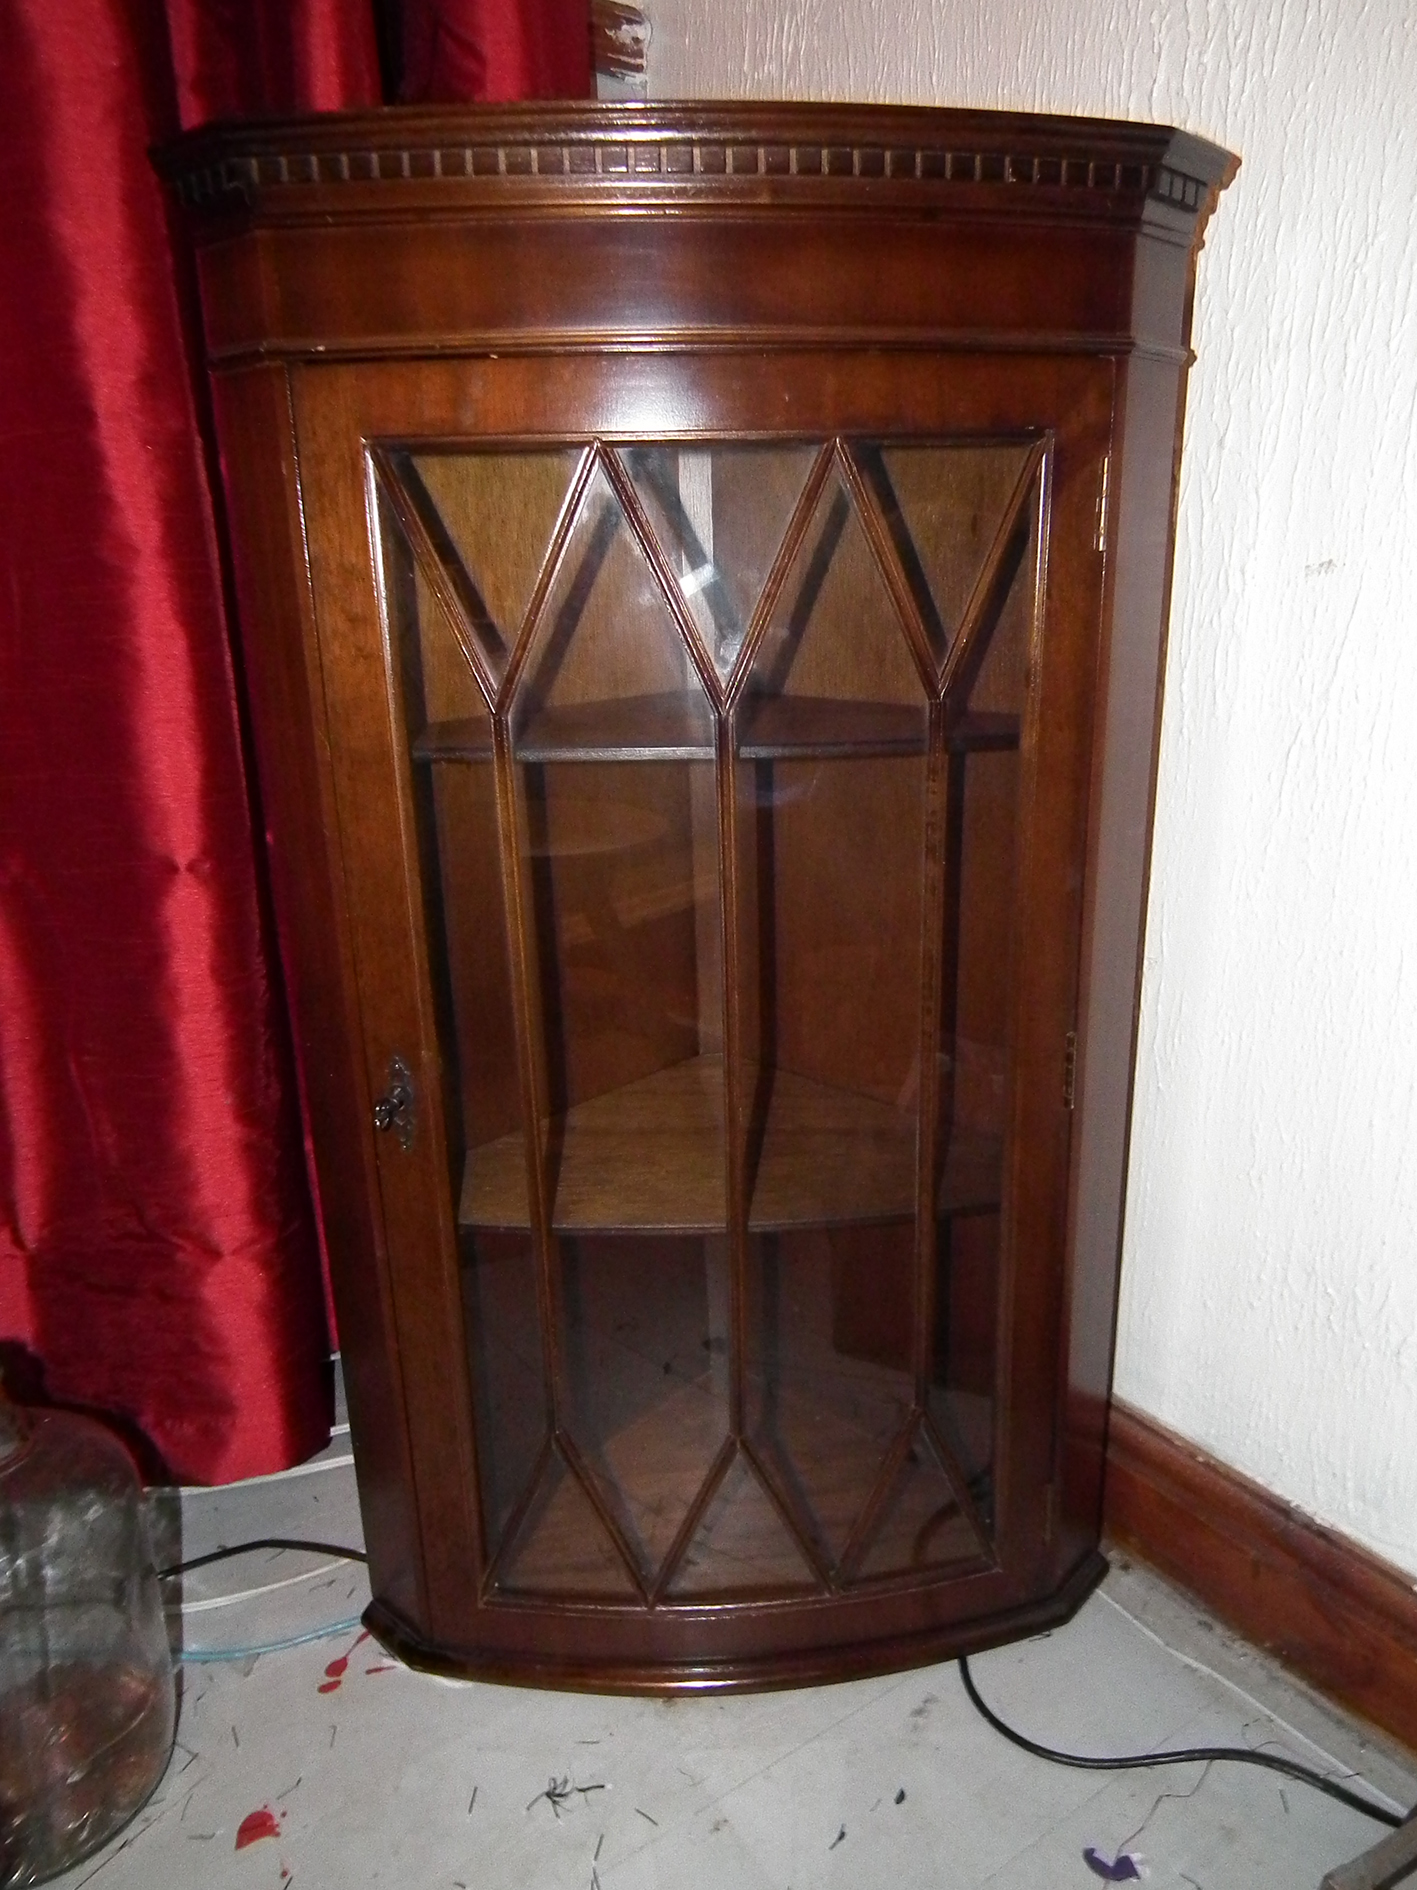
Occasionally we will buy a few items bunched together as one lot at an auction. This piece came with the dresser that Mark gave a complete makeover to a few weeks back.
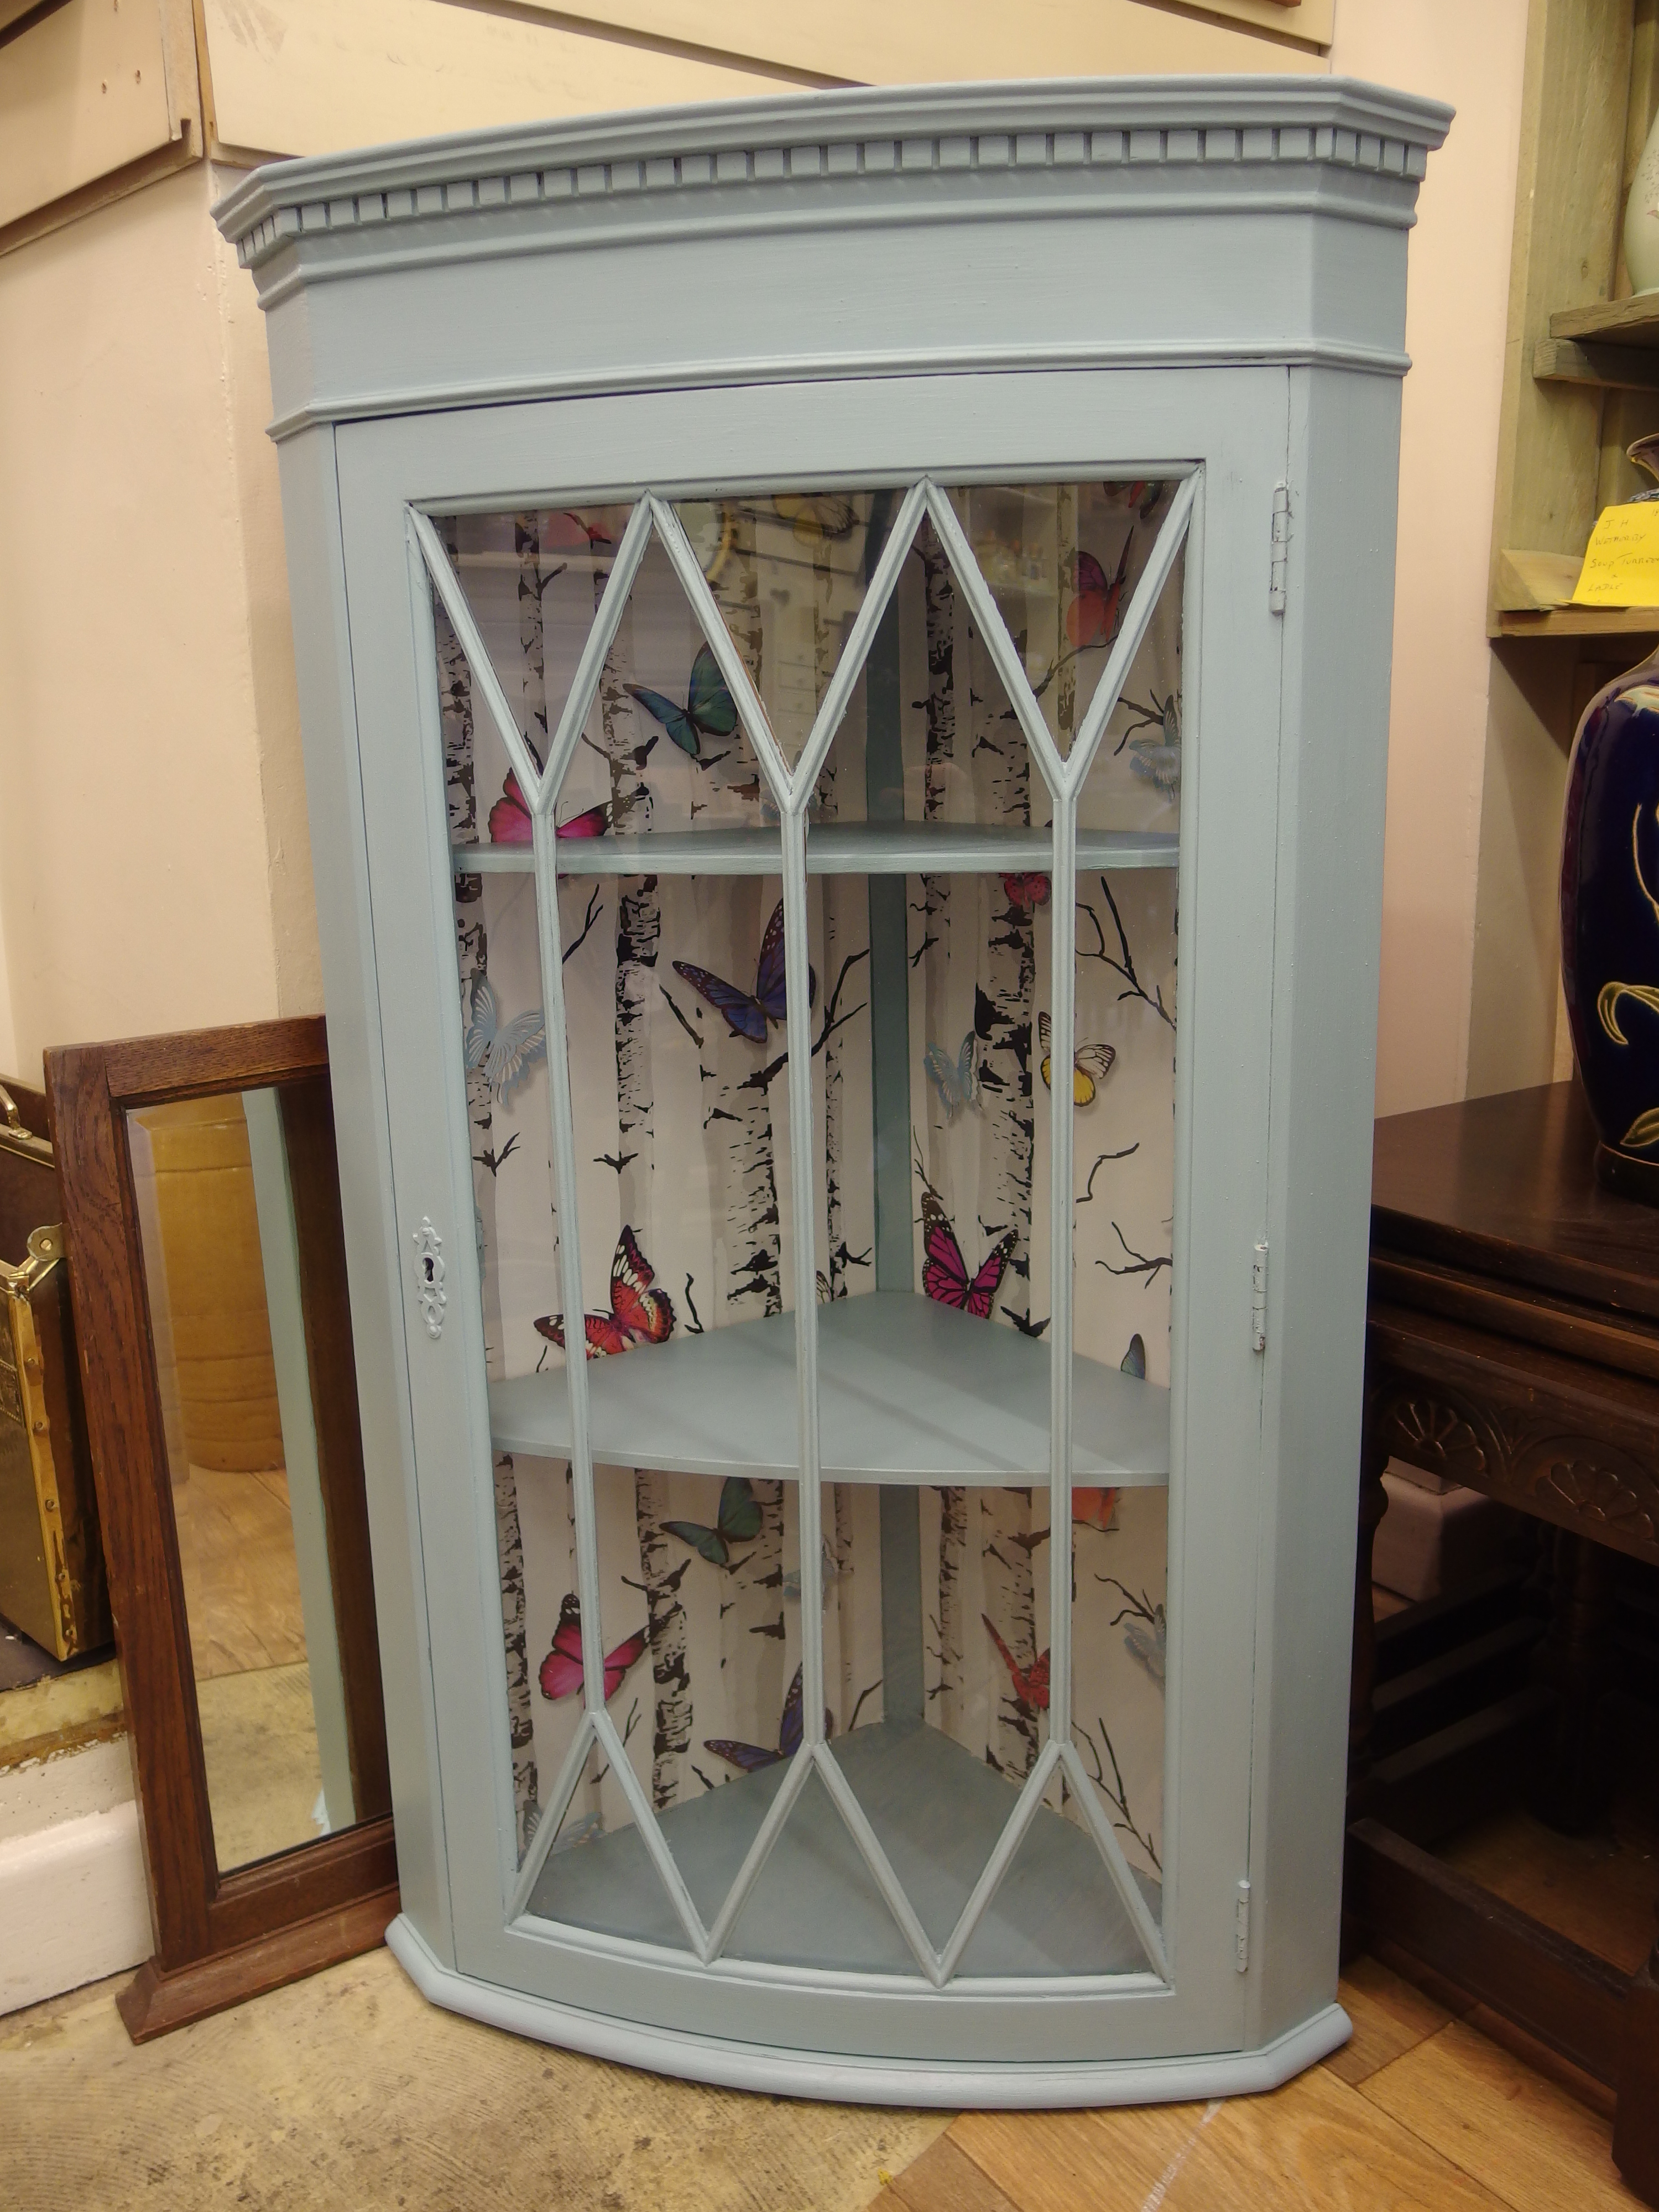
It’s the top of a mahogany corner unit similar to a few others we already have in stock. Mark put it straight into the shop to fill a gap and we forgot about it.
The other day when we were starting our spring fling clear-out of unwanted stuff at the shop Mark said to take it over the road to the charity shop. It’s a well made piece with no faults, and still has the original key with it, so I couldn’t give up on it so easily.
Quite uninspiring
Once it was in the corner of my living room I set about finding the look to vamp it up a little in the style department. I knew I wanted something bright and fresh – a complete contrast to the dark finish it originally had. Then I found some stunning wallpaper while shopping for another project…
WOW!
I’d always wanted to try papering the inside of one of these things and this was my chance. So home I came with the paper and, after a bit of faffing around, I managed to mix a beautiful shade of duck egg blue that matched it perfectly.
So I painted it all over with two coats, not minding the glass as this cleans back easily. Then I set to sticking the paper in which proved a lot more awkward than putting it onto a wall – think back to trying to put wallpaper in your dolls house and you are on the right tracks!
I just love the paper!
Once that was done I had to decide on a finish for it. I didn’t want it distressed, I wanted the main feature to be the paper background, so I gave it a thin coat of wax varnish I’ve been wanting to review for a while (post coming soon). The finish wasn’t a luxurious as wax but it makes it a more durable piece that will withstand a little abuse.
It’s already back in the shop, Mark changed his mind about giving it to charity for now!
So, which do you prefer, the traditional mahogany or the bright finish?
I’ve read some great blog posts this past few weeks and thought that if I love them then you might too? Okay, you probably already subscribe to a few (if not all) of them but they are really worth checking out – if you haven’t already!
I might try to make this a regular Sunday night thing, if nobody minds?
First up is this from Ferpie and Fray. It was great to read about a transformation that all went to plan!
Loved this no hassle transformation at Ferpie and fray
This next piece is NOTHING like how I would have painted it but isn’t that part of what makes sharing great? I love how it turned out and I’m sure her client does too. See the before and after at This Delightful Life.
I always read posts from Phoenix Restoration and really love her work. This piece struck me because of the great use of colour.
Love a lot of her work!
This post from Me Myself n DIY made me laugh so hard! She talks about the 6 stages of failure we have all gone through (or something very similar) when working on that ‘pig of a project’ that comes along every so often!
This post made me laugh so hard – we’ve all been through it!
And finally… I was intrigued by this post as I have been itching to paint fabric chairs for about 6 months now and just haven’t found the right piece! See how the Interior Frugalista copes with this project on a tight schedule
I have always wanted to try this!
Of course I have read a tonne of great posts but had to set a limit and 5 seemed about right. Hope you enjoy them as much as I did!
Blogging has really helped me to keep motivated this past few weeks and the post-Christmas blues haven’t been able to take hold. It has also made me try new things (like distressing with vinegar) and revisit methods I haven’t used for a while (watch out for a post about crackle finish using pva glue).
In the hope that it can have a similar effect on Mark I am going to try to include a post once a week of what he’s been working on. Most of it shouldn’t need any explaining but, if you do have any questions, please leave a comment and I’ll answer every one.
This week has been about refinishing a cute little nest of tables. Mark loved the blue and red table I told you about not long ago, so used the same colour combo on the tables. I found a wonderful wallpaper, that looks like old books on shelves, to go under the glass that finishes them off beautifully!
You find these quite often at auctionNice legs 😉First redThen Blue…Rubbed back just a little…Add some clear waxPut your wallpaper in…Ta-da!
I really like them, but of course he based them on one of my pieces and I chose the paper so I’m going to be completely biased!
Use something we all own to get a great distressed finish
I’m an old-fashioned kind of girl who finds a method that works and sticks to it. That means I can spend hours, days even, gently rubbing back paint to get just the right distressed finish required.
Recently I’ve been thinking that there must be an easier way? I believe in doing the job right but if there’s a way to do it right and quickly shouldn’t I be using it? Sure enough there are lots of ways people distress their furniture I hadn’t even considered so in the next few weeks I’m going to be trying them out (or some at least) and sharing my findings with you, dear reader.
This cost pennies
This first method uses something most of us keep in the pantry… vinegar. I decided to opt for distilled or white vinegar as I didn’t want it to stain the paint in any way. Obviously I didn’t have any distilled vinegar in my store cupboard so that meant a trip to town and another hour out of my day!
Anyway I already had this cute little shelf unit (spice rack maybe?) that I found in a charity shop a few weeks back. It is pretty featureless so will rely on having a good paint effect to give it some oomph.
You will often see pieces like this in charity shops
I started with a quick coat of Annie Sloan’s Antibes Green, as I had some left over from an earlier project. As always with this colour I was tempted to stop there, but then I’d have nothing to share with you, so I gave it a quick wax using Rusto-leum clear furniture wax. Then it got 2 coats of my own deep lavender (okay, I’ve got to come up with some cool names for my paints) and left it to dry thoroughly.
I just love this as a contrast colourMy own mix over the green
Once dry, I just dipped my microfiber cloth in the vinegar and wiped it over an area. Nothing happened. I rubbed a bit harder. Nothing happened. Then, as I was showing Mark how ineffective it was, a huge streak of the lavender rubbed clean off!
This big chunk wiped off in one go!
I think the knack is to almost soak the paint in vinegar and give it a second to soak in. I’m really glad I took the time to wax after the green or I think it would have wiped off at the same time – the wax was just enough of a barrier to protect it.
Once I got the hang of it, it was so easy! I wouldn’t want to use it on everything because you just don’t have the same control as you do sanding by hand, but if you want a beat up, rustic look then this is great.
You need a gentle touch until you get used to it!
In the interests of science (or maybe just because I’m still a wee bit sceptical) I’m going to try a similar experiment using plain water and another using something like lemon juice so I’ll keep you updated – be sure to follow us so you don’t miss a thing!
Finished piece after a top coat of wax varnish
Tune in next week to see how I got on using Vaseline to distress a mirror in my lounge, and please let me know if you’ve heard of a method of distressing you’d like me to try, and review!
Well I keep hinting at exciting new changes going on with us, and promising to tell all ‘soon’, well it’s about time I put you out of your misery and let you know what we’re up to!
Firstly I am enjoying writing this blog so much we are going to commit our URL (that’s web address to us non-techy peeps) to it instead of a traditional web site. I just have to get BT (British Telecom to my non UK readers) to give me access to my account so I can redirect. Don’t worry, I will write again once I have all the details and I really hope you will follow us over to our new home.
Our next big thing is a re-launch of the shop. It had started to lose its way and become more of a second-hand store than somewhere to find great furniture that had belonged to somebody once before. Mark and I have talked lots over the Christmas holidays and have decided that we want to concentrate more on the painted and refurbished, the fun and funky. We will have to keep a little of the other stuff because people are buying it, but there is going to be a lot more of my influence in there and a lot less Poole Pottery! That being said, the shop is still Mark’s territory while I stay firmly behind the scenes.
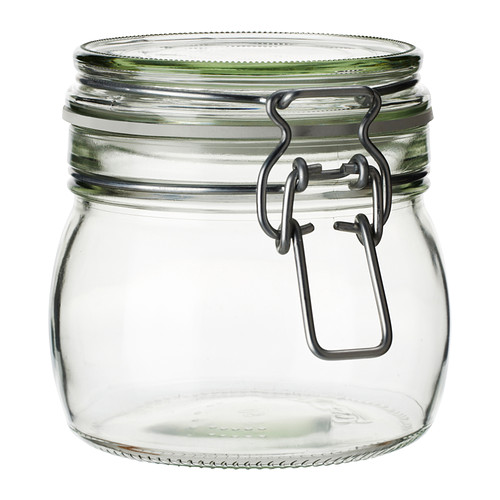
As part of this re-launch we have decided to start selling a few extra bits and bobs… mouldings for furniture, handles and knobs and (most exciting for me) our own range of chalk paints!!!
I’ve been experimenting with paints for a few months now and think I’m happy with my recipe. The paints go on well, sand back well, and keep well. I have a small range of colours and can afford to sell them at around £10 for half a litre (I’ve still to do the math to make sure we aren’t losing or being greedy). I have been working on the packaging and decided to go for glass Kilner or Mason style jars for a couple of reasons. First off I like the way you can see how much paint you have left and exactly what colour it is at a glance, I like that the paint washes right off them giving you a useful container to reuse and, lastly, I like the way they look stacked up on my shelf!
I love the look of Kilner or Mason type jars
I’ve given them their own name – The Little French Paint Company – as I will be selling them independently of Big Red Barn and thought that some of the other shops I’ll be approaching might not be comfortable advertising our shop, being the competition and all that! If you are wondering Mark’s surname is French and, if I ever get around to planning our wedding, one day mine will be too. I can also use it on other things I make as it’s so generic – The Little French Soap co, The little French Candle co… get it?
So you see it’s a very exciting time for us and I haven’t even mentioned that we hope to start running classes later on in the year or that we’re trialling some silver jewellery in one of our cabinets! Busy, busy, busy, but happy, happy, happy too 🙂
What are your big plans for 2015? Are you branching out or launching a new product? Perhaps you are planning a home makeover you’d like to share? I love getting your comments and will always reply to any questions.
Myself and Caractacus trying to achieve the same as every other British couple who have upped sticks and moved to France in an effort to recreate the good life.So far it has been more Victor Meldrew than Felicity Kendal, but we are still here, still trying our best, and sometimes succeeding but in a roundabout sort of way